
Installing hardwood floors can transform the look and feel of your home, adding timeless beauty and increased property value. While hiring a professional may seem like the safest route, many homeowners choose to tackle hardwood floor installation as a DIY project. With the right tools, materials, and guidance, you can successfully install your own flooring and take pride in the result.
This complete guide will walk you through every step of the process, from preparation to finishing touches, to ensure your new hardwood floor is installed correctly and lasts for years.
Why Choose Hardwood Flooring?
Hardwood floors are a popular choice among homeowners due to their durability, elegance, and longevity. They are easier to clean than carpet, more stylish than vinyl, and can be refinished several times over their lifespan.
Popular hardwood options include oak, maple, hickory, and walnut. You can choose between solid hardwood and engineered hardwood depending on your budget and subfloor conditions.
Tools and Materials You’ll Need
Make sure you have all the necessary tools and materials on hand before you begin installing your hardwood floors.
- Tape measure
- Chalk line
- Pry bar
- Nail gun or flooring stapler
- Circular saw or jigsaw
- Spacers
- Moisture barrier (if installing over concrete)
- Underlayment (for added comfort and sound insulation)
- Safety goggles and gloves
- Flooring adhesive (for glue-down method)
| Pro Tip: Rent a flooring nailer or stapler from a local hardware store instead of buying it for a one-time project. It will save money and ensure precision during installation. |
Step 1: Acclimate the Hardwood
Hardwood flooring needs to adapt to your home’s temperature and humidity before installation. Leave the planks in the room where they will be installed for at least 72 hours. This step is crucial for preventing future problems such as board separation or buckling.
Step 2: Prepare the Subfloor
Your subfloor must be clean, dry, and level. Remove any existing flooring, nails, or staples. Use a level to check for dips or high spots and correct them using a leveling compound or sanding as needed.
If you’re installing over concrete, you’ll need to add a moisture barrier to protect your new floors from dampness.
Step 3: Plan the Layout
Determine the direction of your planks. Many homeowners choose to lay hardwood planks in line with the longest wall or toward the primary source of natural light to enhance the room’s visual flow. Use a chalk line to create a straight reference line.
Make sure to stagger the joints between boards for both strength and appearance. Avoid placing seams too close to each other.
Step 4: Install the First Row
Place spacers between the wall and the flooring to allow room for expansion. Start laying the first row of boards along your reference line. If you’re nailing down the boards, face-nail the first row to keep it in place, as the nailer won’t fit against the wall.
Ensure the first row is perfectly straight. Any mistakes here will affect the rest of the installation.
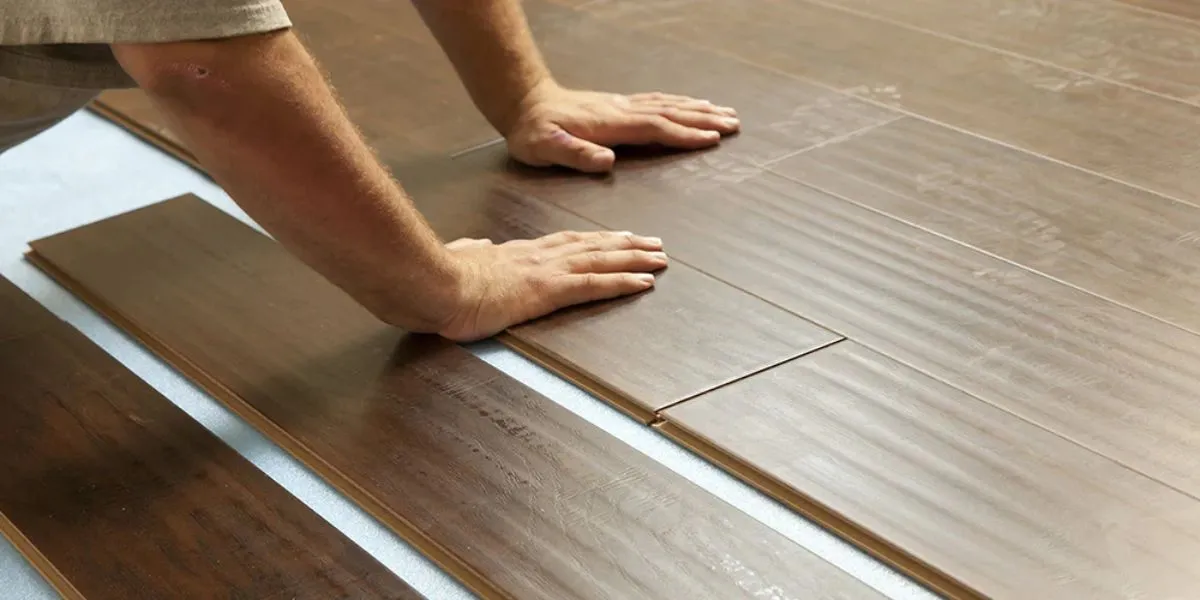
Step 5: Continue Laying the Flooring
After securing the first row, proceed by attaching the remaining boards with a flooring nailer or stapler, ensuring tight seams between each plank. Tap boards into place with a mallet and ensure tight joints between planks. Stagger the boards by cutting the first plank of every second or third row to different lengths.
If you’re using the glue-down method, apply adhesive to the subfloor using a notched trowel and lay the planks carefully.
Step 6: Cut to Fit
Use a circular saw or jigsaw to cut the boards as needed, especially when reaching corners, doorways, or odd-shaped spaces. Work carefully to make precise, clean cuts for a polished final look.
Don’t forget to leave an expansion gap around the perimeter of the room.
Step 7: Install the Final Row
The last row may need to be ripped down to fit. Measure the space carefully, accounting for the expansion gap, and cut the planks accordingly. You’ll likely need to face-nail or glue the final row into place.
Step 8: Add the Finishing Touches
Once all planks are installed, remove the spacers and install baseboards or quarter-round molding to cover the expansion gaps. If any face nails are visible, you can fill them with matching wood putty.
Clean the floor thoroughly to remove any dust or debris.
| Pro Tip: Use felt pads under furniture and avoid wearing high heels on hardwood to prevent dents and scratches. Also, keep pets’ nails trimmed. |
Common Mistakes to Avoid
- Skipping the acclimation: This process may cause the wood to warp or develop gaps once installed.
- Not checking for level subfloors: Uneven surfaces can lead to squeaks or damage.
- Incorrect spacing: Failing to leave expansion gaps can cause buckling.
- Poor planning: Random seam placement can ruin the floor’s visual appeal.
Final Thoughts
Taking on hardwood floor installation as a DIY project can be demanding, but it offers great satisfaction and long-term value. With patience, precision, and proper preparation, you can save money and enjoy the satisfaction of a job well done. Whether you’re updating a single room or your entire home, hardwood flooring offers beauty and durability that lasts.
For professional help or advice, Reliable Hardwood Floors is always here to assist homeowners with expert services and guidance for flawless flooring results.
FAQs About DIY Hardwood Floor Installation
Q1: Can I install hardwood floors over tile or vinyl?
A: It’s not recommended. You should remove the existing flooring and prepare a clean, level subfloor for proper installation.
Q2: Is it simpler to install engineered hardwood compared to solid hardwood?
A: Yes, engineered hardwood often comes in click-lock systems and is more forgiving with moisture, making it ideal for basements or DIY projects.
Q3: How long does it take to install hardwood flooring?
A: For a single room, most DIYers can complete the project in 2 to 3 days, including prep time.
Q4: Should I use nails, staples, or glue?
A: It depends on your subfloor and the type of hardwood. Solid hardwood is often nailed or stapled, while engineered wood may be glued or floated.
Q5: Do I need to seal hardwood floors after installation?
A: Most prefinished hardwood comes sealed. If you’re using unfinished wood, you’ll need to sand and apply a sealant or finish after installation.